
Before you start: Prerequisites and Tools
Before you can begin the process of deploying Microsoft 365 Copilot, it's crucial to ensure you have the correct administrative permissions and understand the foundational technical landscape. Attempting to purchase or assign licenses without these prerequisites in place will lead to errors and delays. This initial phase is about preparation and verification.
Administrative Access
You will need specific roles within your Microsoft 365 tenant to perform the required actions. Ensure your account has one of the following roles:
- Global Administrator: Can perform all administrative tasks across the tenant.
- License Administrator: Can assign, manage, and purchase licenses.
- User Administrator: Can manage user accounts and their licenses.
Most of the steps outlined in this guide can be performed with License Administrator privileges, but initial service purchases may require Global Administrator access.
Required Tools & Portals
Your primary workspace for this entire process will be the Microsoft 365 admin center. Familiarize yourself with the following portals:
- Microsoft 365 Admin Center: https://admin.microsoft.com
- Microsoft Entra Admin Center: https://entra.microsoft.com
No special software is needed for the licensing process itself, but you will need a modern web browser and the appropriate credentials to access these portals.
Step 1: ✅ Validate Your Microsoft 365 Base Licenses

Goal: To confirm that all users intended for Copilot have a qualifying prerequisite base license. Microsoft 365 Copilot is an add-on; it cannot be purchased or assigned to a user without one of the required foundational subscriptions.
Exact Actions:
- Navigate to the Microsoft 365 admin center.
- In the left-hand navigation pane, go to Billing > Your products.
- Review the list of your current subscriptions. You are looking for one of the following plans assigned to your users:
- Enterprise: Microsoft 365 E5, Microsoft 365 E3, Office 365 E5, or Office 365 E3.
- Business: Microsoft 365 Business Standard or Microsoft 365 Business Premium.
- Education (Faculty): Microsoft 365 A5 or Microsoft 365 A3.
- To check which users have which licenses, go to Users > Active users. Select a user and click on the Licenses and apps tab. Verify they have one of the eligible licenses.
It's critical to understand which base license for Copilot you have. A common point of confusion is between 'Office 365' plans and 'Microsoft 365' plans. While both Office 365 E3/E5 are qualifying base licenses, the 'Microsoft 365' E3/E5 plans often provide a more comprehensive suite of security and management tools that are highly recommended for a secure Copilot deployment.
Expected Result: You will have a definitive list of active users who hold a qualifying base license and are eligible to have a Copilot add-on license assigned to them.
Troubleshooting:
- Problem: A user has a plan like 'Exchange Online Plan 1' or 'Microsoft 365 Apps for business'.
- Solution: These are not sufficient base licenses. The user must be upgraded to a qualifying plan like Microsoft 365 Business Standard or Microsoft 365 E3. You must perform a license upgrade before you can assign a Copilot license to that user.
- Problem: You have 'Office 365 E3' and are concerned you are missing features.
- Solution: While Office 365 E3 is a valid prerequisite, consider the benefits of upgrading to Microsoft 365 E3. The latter includes advanced security and device management features (like Intune and enhanced Entra ID capabilities) that are vital for a modern, secure workplace, which is one of the core Microsoft 365 Copilot prerequisites.
Step 2: 🔐 Prepare Microsoft Entra ID and User Accounts
Goal: To ensure all user accounts are properly configured in Microsoft Entra ID (formerly Azure Active Directory), as Copilot licenses are tied directly to these identities.
Exact Actions:
- Log in to the Microsoft Entra admin center at entra.microsoft.com.
- Navigate to Identity > Users > All users.
- Review the list of users you plan to license for Copilot. Ensure their account status is 'Enabled' and that their User Principal Name (UPN) is correctly formatted (e.g., user@yourcompany.com).
- Copilot relies on the user's Entra ID profile for context. Ensure user profiles are populated with accurate information, such as department and job title, for the best experience.
- If you operate in a hybrid environment, verify that your Active Directory Domain Services (AD DS) accounts are syncing correctly to Microsoft Entra ID via Microsoft Entra Connect. The UPN and other attributes must match between on-premises AD and Entra ID.
Expected Result: All users targeted for Copilot licensing will have an active, correctly configured Microsoft Entra ID account. This identity is the anchor for the license and all associated security and permissions.
Troubleshooting:
- Problem: A user is not showing up in the user list for license assignment.
- Solution: Verify the user's account is not disabled in either the Microsoft 365 admin center or the Entra admin center. If in a hybrid environment, check the Entra Connect Sync logs for any synchronization errors related to that user object.
- Problem: You want to license a guest or B2B user.
- Solution: As of the current licensing model, Microsoft 365 Copilot licenses must be assigned to user accounts homed within your tenant. External or guest users cannot be licensed directly with your tenant's Copilot licenses.
Step 3: 🖥️ Deploy Required Client Applications
Goal: To ensure all target users have the necessary versions of Microsoft 365 applications installed, as Copilot features are embedded directly within them and are not delivered via the web alone for all experiences.
Exact Actions:
- Verify Application Suite: The core Microsoft 365 Apps for enterprise requirement is non-negotiable. Users must have this suite installed. Versions like Office 2021 LTSC or Office 2019 are not supported. To check, open an application like Word, go to File > Account, and under 'Product Information', you should see 'Microsoft 365 Apps for enterprise'.
- Check Update Channel: Copilot features are rolled out through specific update channels. To guarantee timely access to all features, users should be on either the Current Channel or the Monthly Enterprise Channel. The Semi-Annual Enterprise Channel will receive updates much later and may not provide the full Copilot experience. You can see the Update Channel under the 'About' section in File > Account.
- Deploy the New Outlook: For the best-integrated experience in email, users must be using the 'New Outlook for Windows'. This can be enabled via the toggle in the classic Outlook client. Ensure your organization's policies allow for this switch.
- Microsoft Teams: Ensure users are on the latest version of the Teams desktop client or using the progressive web app.
Expected Result: All licensed users have Microsoft 365 Apps for enterprise deployed and are configured for an update channel that receives monthly feature updates, ensuring Copilot functionality appears as expected.
Troubleshooting:
- Problem: Users have 'Microsoft 365 Apps for business'.
- Solution: This is generally sufficient as it's the version included with Business Standard/Premium. 'Apps for enterprise' is the equivalent suite for E3/E5 plans. The key is that it's the subscription version of the apps, not a perpetual license version.
- Problem: Users are on the Semi-Annual Enterprise Channel and cannot see Copilot features.
- Solution: You must move these users to a faster channel. This can be done via administrative tools like Microsoft Intune (using a 'Settings Catalog' profile) or Group Policy (using the ADMX templates for Microsoft 365). Plan for this change carefully as it will accelerate the update cadence for all of Office for those users.
Step 4: 🌐 Configure Network and Endpoint Access
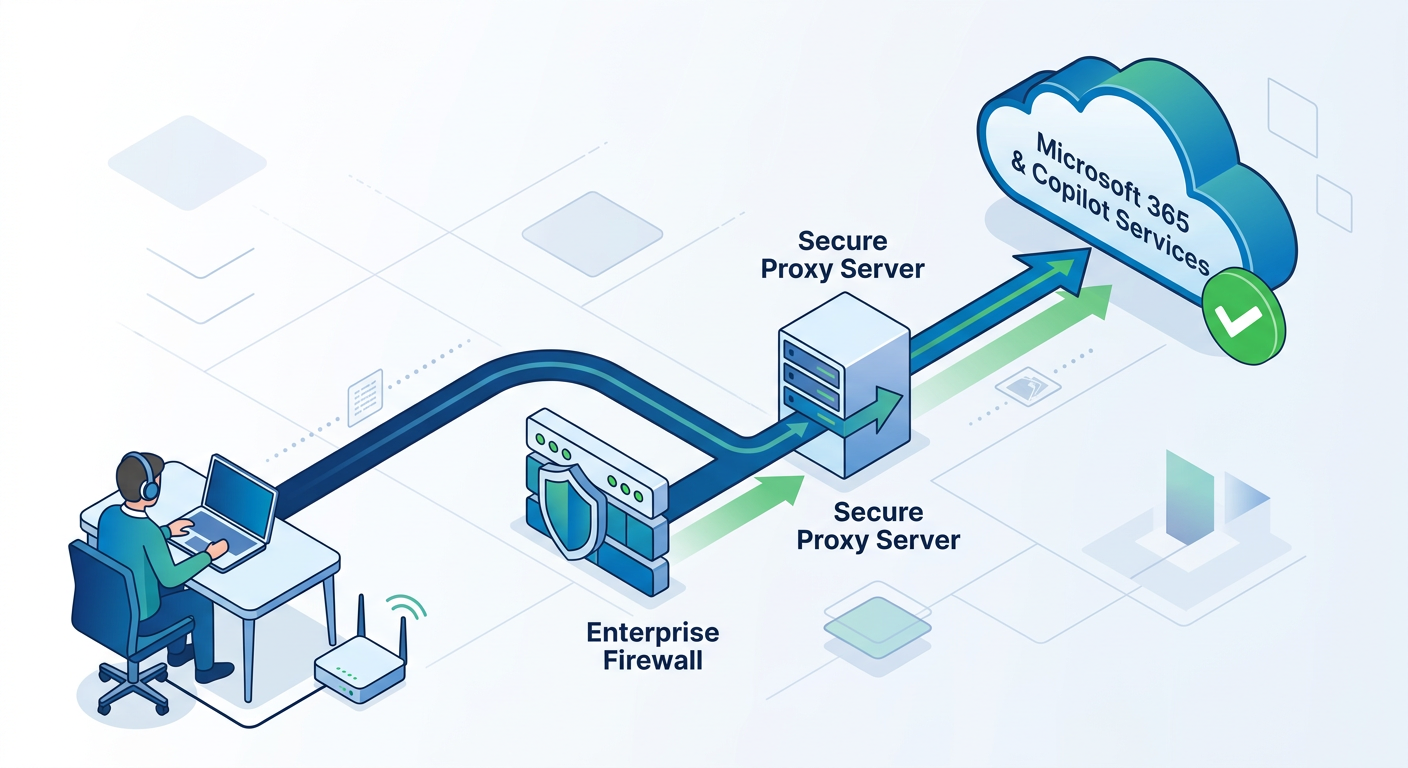
Goal: To ensure that corporate firewalls, proxies, and other network infrastructure allow seamless and performant connectivity to the backend services that power Microsoft 365 Copilot.
Exact Actions:
This step is a critical part of any Copilot network configuration guide and usually requires collaboration with your networking team.
- Review Official Endpoints: Microsoft maintains a definitive list of all required IP addresses and URLs for its services. Copilot introduces new endpoints. The primary domain to ensure is unblocked is
*.copilot.microsoft.com. - Check Proxy Configuration: Ensure that your proxy server is not performing SSL/TLS decryption (also known as deep packet inspection) on traffic to Copilot endpoints. This can interfere with the secure connection and cause service failures. Create exceptions for the required domains.
- Firewall Rules: Verify that your firewall rules allow outbound WebSocket connections to the specified endpoints over TCP port 443. WebSockets are used for real-time communication between the client application and the Copilot service.
- Bandwidth Considerations: While Copilot itself is not excessively bandwidth-intensive, its use can encourage more interaction with cloud-based data (e.g., retrieving and summarizing large documents from SharePoint). Monitor your network capacity as adoption grows.
Expected Result: User devices have unimpeded network access to all necessary Microsoft 365 and Copilot service endpoints, resulting in a responsive and reliable user experience.
Troubleshooting:
- Problem: The Copilot icon appears in apps but is greyed out or gives a connectivity error when used.
- Solution: This is a classic symptom of a network block. Use your browser's developer tools (F12) on a web app like Word online and watch the 'Network' tab for failing connections when you try to invoke Copilot. The specific URL that is being blocked will be shown in red. Provide this URL to your network team to add to the allowlist.
- Problem: The connection is slow and unreliable.
- Solution: Ensure you are following Microsoft's network connectivity principles, such as routing Microsoft 365 traffic directly to the internet from branch offices rather than backhauling through a central data center. This reduces latency and improves performance for all Microsoft 365 services, including Copilot.
Step 5: 📊 Set Up the Semantic Index for Copilot
Goal: To enable and understand the Semantic Index, a critical component that allows Copilot to provide contextually relevant and personalized responses based on your organization's data.
Exact Actions:
The Semantic Index for Copilot explained simply is this: it's a highly sophisticated map of your organization's Microsoft 365 data. It goes beyond simple keyword search to understand conceptual relationships between people, content, and activities. This index is a feature included with your paid Copilot for Microsoft 365 licenses and is what enables rich, cross-app search and discovery.
- Navigate to the Microsoft 365 Admin Center.
- Go to Settings > Search & intelligence.
- Under the 'Configurations' tab, locate the setting for 'Semantic Index'.
- If you have qualifying licenses (like M365 E3/E5 with Copilot), you will see the status of the index here. You can enable it for specific SharePoint sites or for the entire organization.
- When enabled for a user with a Copilot license, their data (emails, chats, files they have access to) is included in this advanced index.
Expected Result: The Semantic Index is enabled and shows a status of 'Active' or 'Indexing in progress'. This ensures that when a user asks Copilot a question, it can reason over their emails in Outlook, their chats in Teams, and their files in SharePoint and OneDrive to provide a comprehensive answer grounded in their work context.
Troubleshooting:
- Problem: The Semantic Index section shows it is not active or available.
- Solution: This feature is tied to having both the qualifying base licenses AND the Copilot add-on licenses. Ensure you have purchased and assigned at least one Copilot license to see this feature activated in the admin center. There is no separate SKU to purchase for the index itself.
- Problem: Indexing seems to be taking a very long time.
- Solution: This is normal, especially for large tenants with vast amounts of data. The initial indexing process can take hours or even days. It's an ongoing process that continuously updates as new data is created and modified. As long as the status is not showing a persistent error, patience is key.
Step 6: 🛒 Purchase and Assign Copilot Licenses
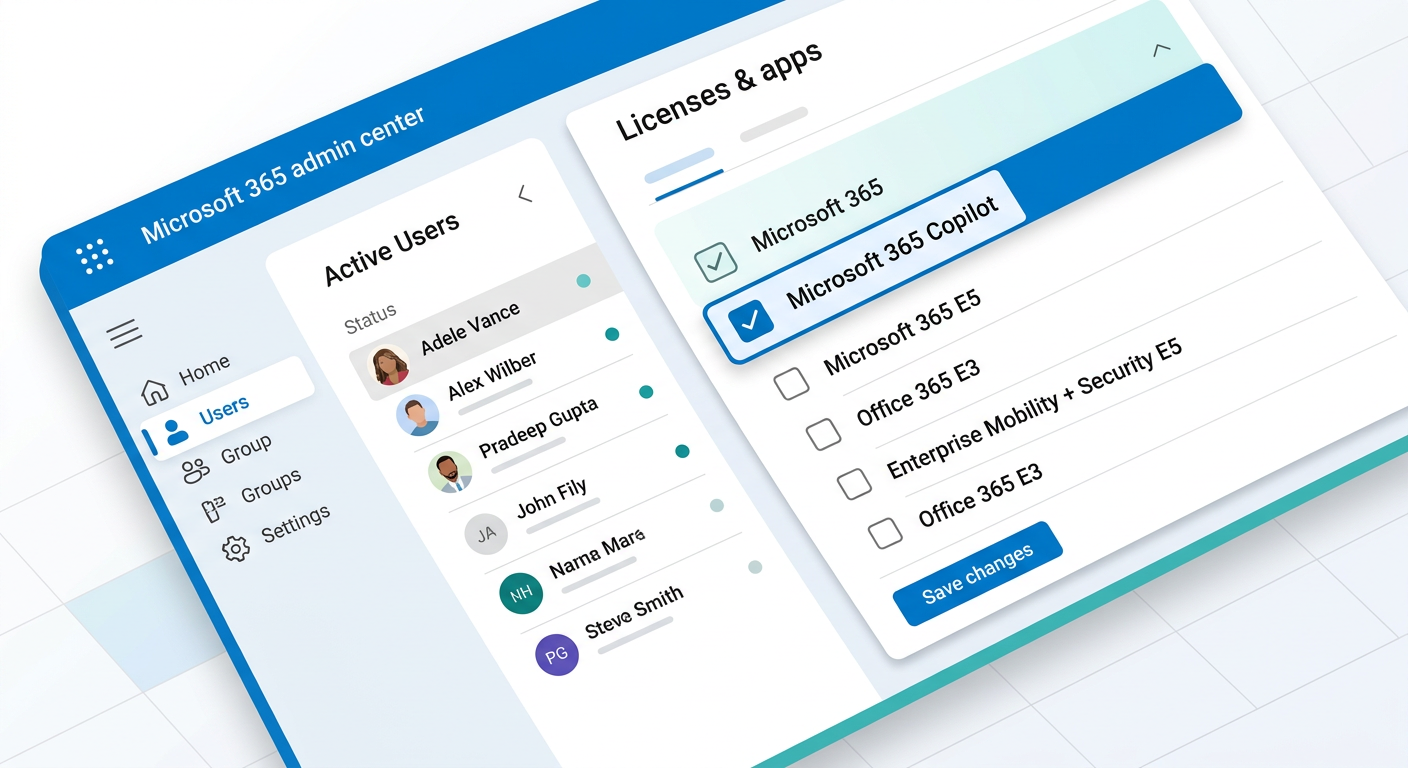
Goal: To navigate the Microsoft marketplace to purchase the required number of Copilot licenses and then correctly assign them to eligible users.
Exact Actions:
This step covers the core action of how to license Microsoft 365 Copilot.
- Purchase Licenses:
a. In the Microsoft 365 admin center, navigate to Marketplace in the left pane.
b. Use the search bar to find "Microsoft 365 Copilot".
c. Select the product, click on 'Details', and then 'Purchase'.
d. Enter the number of licenses you need. Note that Copilot is typically licensed on an annual commitment basis.
e. Complete the checkout process. Your new licenses will now be available in your tenant. - Assign Licenses to Users:
a. Go to Users > Active users.
b. Select one or more users you wish to license. For a bulk action, you can check the box next to multiple names.
c. In the pane that appears on the right, click Manage product licenses.
d. Under the 'Licenses' section, find 'Microsoft 365 Copilot' and switch the toggle to On.
e. Ensure the user also has one of the prerequisite base licenses (from Step 1) enabled. The admin center will show a warning if you try to assign Copilot without a valid base license.
f. Click Save changes.
For larger organizations, a more efficient way to enable Copilot for specific users is to use group-based licensing in Microsoft Entra ID. You can assign the Copilot license to a security group, and any user who is added to that group will automatically inherit the license.
Expected Result: The specified users now have an active 'Microsoft 365 Copilot' license visible in their user properties. License propagation can take a few minutes to a few hours.
Troubleshooting:
- Problem: After purchase, the Copilot license doesn't appear in the license assignment list.
- Solution: There can be a propagation delay of up to a few hours between the time of purchase and when the licenses are fully available in your tenant for assignment. If it's been more than 24 hours, contact Microsoft support.
- Problem: You receive an error about 'conflicting licenses' or 'missing prerequisites' when trying to assign the license.
- Solution: This almost always means the user does not have a qualifying base license. Go back to Step 1 and verify the user's subscription. You cannot assign the Copilot add-on by itself.
Step 7: 🛡️ Implement Data Governance with Microsoft Purview
Goal: To establish a baseline of data governance and security controls *before* widespread Copilot use, mitigating the risk of inadvertent data exposure.
Exact Actions:
Copilot honors all existing user permissions. If a user doesn't have access to a file, Copilot cannot use that file to generate a response for them. However, many organizations suffer from 'permission creep,' where over time, users have accumulated access to more data than they strictly need. Copilot can make this over-permissioning more visible. Proactive data governance is therefore essential.
This is where the strategy for Microsoft Purview for Copilot readiness comes in.
- Data Discovery: Use Microsoft Purview's content explorer to understand where sensitive data (like financial records, PII, or intellectual property) resides within your tenant.
- Apply Sensitivity Labels: Deploy Microsoft Purview Information Protection sensitivity labels (e.g., 'Confidential', 'Internal Use Only'). Train users to apply these labels to documents and emails. You can also automate labeling based on content. Labeled content can be protected with encryption and access restrictions that Copilot will respect.
- Configure Data Loss Prevention (DLP): Implement DLP policies for Teams, SharePoint, and Exchange. These policies can detect when sensitive information (identified by its type or by its sensitivity label) is about to be shared in a risky way (e.g., in a Teams chat with external users) and can block the action or warn the user.
- Review SharePoint Permissions: Use SharePoint's built-in sharing reports and access reviews in Entra ID to audit and prune excessive permissions on sensitive sites.
Expected Result: A governance framework is in place that classifies, protects, and controls the flow of sensitive information. This ensures that when Copilot accesses organizational data to formulate answers, it does so within a secure and compliant boundary, preventing accidental oversharing.
Troubleshooting:
- Problem: Users are complaining that Copilot is surfacing information they 'shouldn't see'.
- Solution: This is a permissions issue, not a Copilot issue. The user technically had permission to view that data. Use this as a catalyst to perform an access review for the location where the data came from (e.g., the SharePoint site). Remove the user's direct or group-based permission if it's inappropriate.
- Problem: Getting started with Purview seems overwhelming.
- Solution: Start small. Begin with Data Loss Prevention policies for highly sensitive data like credit card numbers or health information. Then, roll out a simple, three-tiered sensitivity labeling scheme (e.g., Public, Internal, Confidential). The journey to full data governance is iterative.
Verification
Goal: To confirm from a user's perspective that the license has been successfully applied and the Copilot features are active and functional across the Microsoft 365 ecosystem.
Exact Actions:
After completing the assignment in Step 6 and waiting for license propagation (which can take up to a few hours, but is often much faster), ask a newly licensed user to perform the following checks.
- In Desktop Apps (Word, PowerPoint, Excel):
a. Close all Microsoft 365 applications completely.
b. Open Word or PowerPoint.
c. On the 'Home' ribbon, look for the Copilot icon on the far right. Clicking it should open the Copilot chat pane within the document.
d. In Excel, the Copilot button will be on the 'Home' ribbon as well, but note that it is still in preview and functionality may differ. - In Microsoft Teams:
a. Start a new chat with a colleague.
b. Look for the Copilot icon below the message compose box. You can use it to help draft messages.
c. In a scheduled meeting, after the meeting has started, a Copilot button should be available in the top menu bar to transcribe and interact with the meeting content. - In the New Outlook for Windows:
a. Create a new email.
b. Look for the Copilot icon in the toolbar for assistance with drafting ('Draft with Copilot') and summarizing ('Summary by Copilot'). - On Microsoft365.com:
a. Log in to www.microsoft365.com.
b. On the left-hand navigation bar, there will be a dedicated Copilot icon that opens the full-page chat experience, allowing you to ask questions across your entire data graph.
Expected Result: The Copilot features and icons are visible and interactive for the licensed user across the various Microsoft 365 applications. The user can successfully generate content and receive summaries from the AI.
Troubleshooting:
- Problem: A user has a license assigned in the admin center, but the icon doesn't appear in any apps.
- Solution: First, ensure sufficient time has passed for license propagation. Second, ask the user to completely sign out of their Microsoft 365 account (in any app, go to File > Account > Sign Out) and then sign back in. Also, have them check for Office updates manually (File > Account > Update Options > Update Now). Restarting the computer is also a valid step. Third, double-check that they meet the application requirements from Step 3 (correct version, update channel).
- Problem: The icon is visible but greyed out or shows a connectivity error.
- Solution: This points directly to the network configuration issues detailed in Step 4. The user's device cannot reach the Copilot services. The issue needs to be escalated to the network team with the diagnostic steps from Step 4.
📊 Comparison
| Feature / Component | Microsoft 365 Business Standard | Microsoft 365 Business Premium | Microsoft 365 E3 | Microsoft 365 E5 |
|---|---|---|---|---|
| Qualifying Base License for Copilot? | ✅ Yes | ✅ Yes | ✅ Yes | ✅ Yes |
| Microsoft 365 Apps (Desktop) | Apps for business | Apps for business | Apps for enterprise | Apps for enterprise |
| Microsoft Entra ID | Free | P1 | P1 | P2 |
| Microsoft Purview Information Protection | Some features | ✅ Yes (Plan 1) | ✅ Yes (Plan 1) | ✅ Yes (Plan 2 - Automated) |
| Microsoft Purview DLP | For Teams only | ✅ Yes | ✅ Yes | ✅ Yes |
| Microsoft Intune (Device Management) | ❌ No | ✅ Yes | ✅ Yes | ✅ Yes |
| Semantic Index Readiness | ✅ Yes | ✅ Yes | ✅ Yes | ✅ Yes |